Zeven Development
 This is an image title
 This is an image title
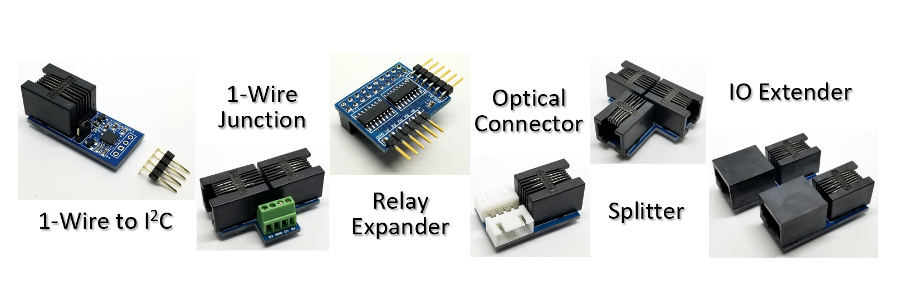 This is an image title
 This is an image title
 This is an image title
Basement/Crawlspace Ventilation
Use the IO Expander to create a Smart Moisture Control Ventilation System (New v1.1).
Intelligently reduce the moisture in your basement/crawlspace to help control mildew growth and reduce your heating/cooling bill. Use Inside/Outside humidity sensors to make a smart decision when to properly vent your basement/crawlspace.
Feature List
- Inside/Outside Temperature/Humidity Sensor.
- Smart vent fan control with dewpoint comparison.
- Reduce the moisture in your basement/crawlspace.
- Help reduce mildew growth.
- Smart ventilating saves power.
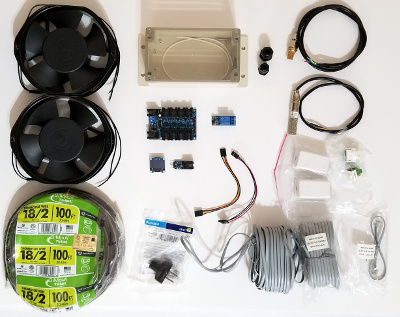
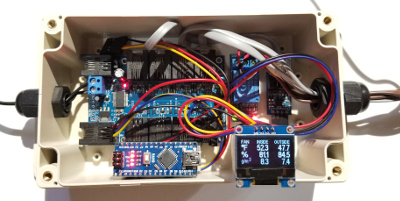
Parts needed to build the Ventilation System
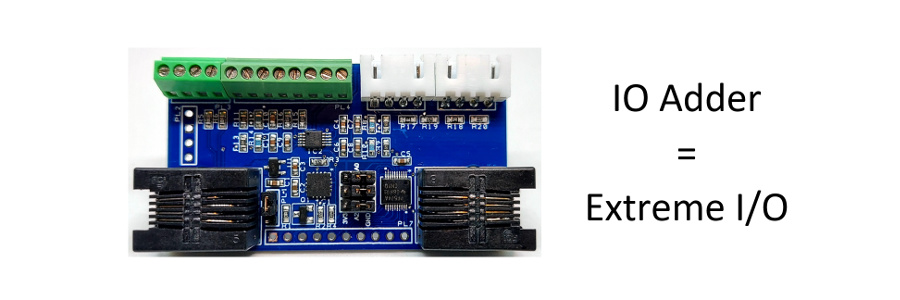
- IO Expander
- 1-Wire to I2C.
- Arduino Nano.
- 1 Channel DC 5V Relay.
- x2 SHT10 Humidity Sensor.
- I2C SSD1306 OLED 128x64 Display.
- x2 110V 172x150x38mm 0.34A 2400 RPM Ball Bearing Fans.
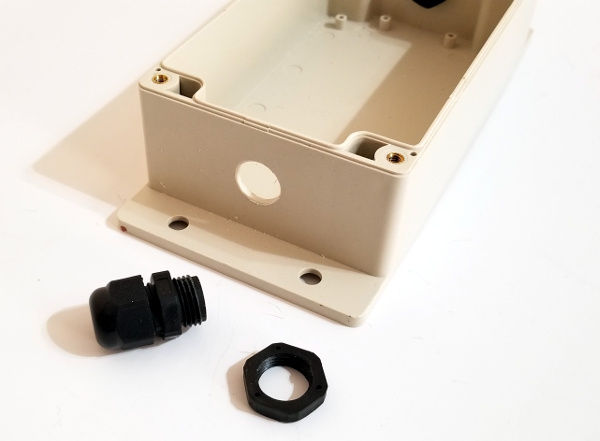
- 158x90x65mm Clear Waterproof Plastic Enclosure.
- ip68 pg7 Waterproof Nylon Cable Gland.
- ip68 pg9 Waterproof Nylon Cable Gland.
- x2 RJ11 Keystone Screw Terminal Jack.
- x2 Keystone Enclosure.
- x2 50ft 4C4P RJ11 Wire.
- 6" 4C4P RJ11 Wire.
- 100ft 110V Wire.
- AC Plug.
- 2.54mm Header Wire.
- 12VDC 1A Wall Adapter Power Supply.
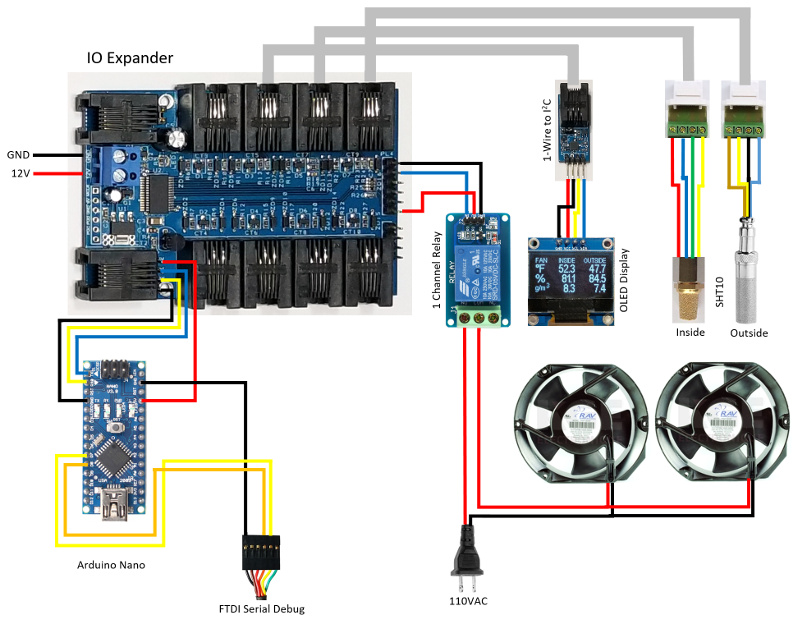
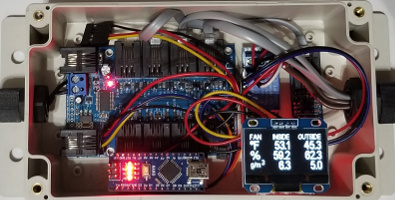
Wiring Diagram
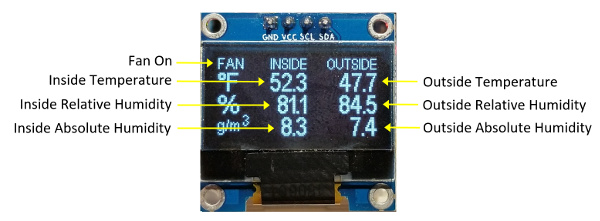
OLED Display
So why use the IO Expander?
- Simpler to Design.
- Off-The-Shelf Parts.
- No 1-Wire Driver to Write.
- No Relay Driver to Write.
- No OLED Display Driver to Write.
- No Display Fonts to Take Arduino Code Space.
- No Humidity Sensor Driver to Write.
- Saves Code Space on Arduino; Only 6106 bytes (19%).
- Less Than a Day to Write the Code.
- Easy to Wire Using Standard RJ11 Phone Cable.
- No Sensor Cable Length Issues.
- Cheaper to Build Than Commercial Systems.
- Easy to Make Changes to Adapt to Individual Requirements.
- Single Power Supply.
Build The System
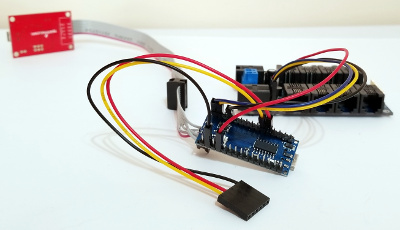
Connect the Arduino Nano to the IO Expander and program it with the following code. The 6 pin header is the software serial debug port and is not needed in the final installation.
Make sure that you change the ONEWIRE_TO_I2C_ROM defined address to match your 1-Wire to I2C address.
/* IO
Expander
*
* Basement/Crawlspace Ventilation System v1.1
*
*/
#include <math.h>
#include <SoftwareSerial.h>
#include <avr/wdt.h>
#include "IOExpander.h"
#define FAHRENHEIT
#define ONEWIRE_TO_I2C_ROM "i4s71"
#define INIT_OLED "st13;si;sc;sd"
#define HUMIDITY_SENSOR_INSIDE "s6t1"
#define HUMIDITY_SENSOR_OUTSIDE "s8t1"
#define FAN_ON "r1o"
#define FAN_OFF "r1f"
#define ABSOLUTE_DELTA_FAN_ON
1 // Fan on if
absolute humidity delta of inside >= outside
#define ABSOLUTE_DELTA_FAN_OFF 0.5
// Fan off if absolute humidity delta of inside <= outside
#define OUTSIDE_RELATIVE_FAN_ON
88 // Fan on if
outside relative humidity is <= %
#define OUTSIDE_RELATIVE_FAN_OFF
90 // Fan off if outside
relative humidity is >= %
#define MINIMUM_TEMPERATURE
15 // Cycle vent
on/off if outside temperature <= 15C/59F
#define FAN_ON_TIME
(20*60*1000L) // 20 min
#define FAN_OFF_TIME (20*60*1000L)
// 20 min
//#define SERIAL_DEBUG
#ifdef SERIAL_DEBUG
SoftwareSerial swSerial(8,7);
#endif
struct HS
{
float temp;
float relative;
float absolute;
bool error;
};
int led
=
13;
bool init_oled
=
true;
long ontime, offtime;
#ifdef FAHRENHEIT
#define C2F(temp) CelsiusToFahrenheit(temp)
float CelsiusToFahrenheit(float
celsius)
{
return ((celsius*9)/5)32;
}
#else
#define C2F(temp) (temp)
#endif
void SerialPrint(const
char*
str, float decimal,
char error)
{
Serial.print(str);
if (error)
Serial.print(F("NA"));
else Serial.print(decimal,
1);
}
float DewPoint(float
temp, float humidity)
{
float t
=
(17.625
* temp)
/
(243.04
temp);
float l
=
log(humidity/100);
float b
= l
t;
// Use the August-Roche-Magnus Approximation
return (243.04*b/(17.625-b);
}
#define MOLAR_MASS_OF_WATER 18.01534
#define UNIVERSAL_GAS_CONSTANT
8.21447215
float AbsoluteHumidity(float
temp, float relative)
{
//taken from https://carnotcycle.wordpress.com/2012/08/04/how-to-convert-relative-humidity-to-absolute-humidity/
//precision is about 0.1°C in range -30 to
35°C
//August-Roche-Magnus 6.1094 exp(17.625 x T)/(T
+ 243.04)
//Buck (1981) 6.1121 exp(17.502 x T)/(T + 240.97)
//reference https://www.eas.ualberta.ca/jdwilson/EAS372_13/Vomel_CIRES_satvpformulae.html
// Use Buck (1981)
return (6.1121
*
pow(2.718281828,
(17.67
* temp)
/
(temp
243.5))
* relative
* MOLAR_MASS_OF_WATER)
/
((273.15
temp)
* UNIVERSAL_GAS_CONSTANT);
}
void ReadHumiditySensor(HS*
hs)
{
SerialCmd("sr");
if (SerialReadFloat(&hs->temp)
&&
SerialReadFloat(&hs->relative))
{
//hs->dewpoint = DewPoint(hs->temp,
hs->relative);
hs->absolute
= AbsoluteHumdity(hs->temp,
hs->relative);
hs->error
=
false;
}
else hs->error
=
true;
SerialReadUntilDone();
}
void setup()
{
Serial.begin(115200);
#ifdef SERIAL_DEBUG
swSerial.begin(115200);
//swSerialEcho = &swSerial;
#endif
pinMode(led, OUTPUT);
wdt_enable(WDTO_8S);
offtime - millis()
- FAN_OFF_TIME;
}
void loop()
{
HS inside, outside;
static
bool fan =
false;
static
bool cycle =
false;
static
long last_time =
-(60L
*
1000L);
Serial.println();
if (SerialReadUntilDone())
{
// Read the humidity sensors only once
a minute or they will self heat if read too quickly
if
(millis()
- last_time
>
60L
*
1000L)
{
if
(SerialCmdDone(HUMIDITY_SENSOR_INSIDE))
ReadHumiditySensor(&inside);
if
(SerialCmdDone(HUMIDITY_SENSOR_OUTSIDE))
ReadHumiditySensor(&outside);
if
(inside.error
|| outside.error)
fan =
false;
else
{
if
(fan)
{
if
(inside.relative
>= OUTSIDE_RELATIVE_FAN_OFF
|| inside.absolute
- outside.absolute
<= ABSOLUTE_DELTA_FAN_OFF)
cycle =
fan =
false;
else
{
if
(cycle
&& outside.temp
<= MINIMUM_TEMPERATURE
&&
millis()
- ontime
> FAN_ON_TIME)
fan =
false;
}
if
(!fan)
offtime = millis();
}
else
{
if
(inside.relative
<= OUTSIDE_RELATIVE_FAN_ON
&& inside.absolute
- outside.absolute
>= ABSOLUTE_DELTA_FAN_ON)
cycle =
fan =
true;
if
(cycle
&& outside.temp
<= MINIMUM_TEMPERATURE)
fan =
(millis()
- offtime
> FAN_OFF_TIME)
?
true
:
false;
if
(fan)
ontime = millis();
}
}
if
(fan)
SerialCmdDone(FAN_ON);
else SerialCmdDone(FAN_OFF);
if
(SerialCmdNoError(ONEWIRE_TO_I2C_ROM))
{
if
(init_oled)
{
SerialCmdDone(INIT_OLED);
init_oled =
false;
}
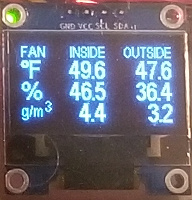
SerialCmdDone("st13;sc;sf0;sa1;sd70,0,\"INSIDE\";sd127,0,\"OUTSIDE\";sf1;sa0;sd0,12,248,\""
#ifdef FAHRENHEIT
"F"
#else
"C"
#endif
"\";sd0,30,\"%\";sf0;sd0,50,\"g/m\";sd20,46,\"3\";");
SerialPrint("sa1;sd70,12,\"",
C2F(inside.temp),
inside.error);
SerialPrint("\";sd70,30,\"",
inside.relative, inside.error);
SerialPrint("\";sd70,48,\"",
C2F(inside.absolute),
inside.error);
SerialPrint("\";sd127,12,\"",
C2F(outside.temp),
outside.error);
SerialPrint("\";sd127,30,\"",
outside.relative, outside.error);
SerialPrint("\";sd127,48,\"",
C2F(outside.absolute),
outside.error);
Serial.print("\";");
Serial.print("sf0;sa0;sd0,0,\"");
if
(fan)
Serial.print("FAN");
else Serial.print("v1.1");
Serial.println("\";sd");
SerialReadUntilDone();
}
else init_oled
=
true;
last_time = millis();
}
delay(1000);
}
else {
digitalWrite(led, HIGH);
delay(500);
digitalWrite(led, LOW);
delay(500);
init_oled =
true;
}
wdt_reset();
}
Note: If you use the USB port to program the Arduino Nano you must disconnect it from the IO Expander since it is also using the same single serial port, instead if you want to debug use the ICSP port to program the ATmega328P. To enable the software debugging port uncomment the SERIAL_DEBUG definition.
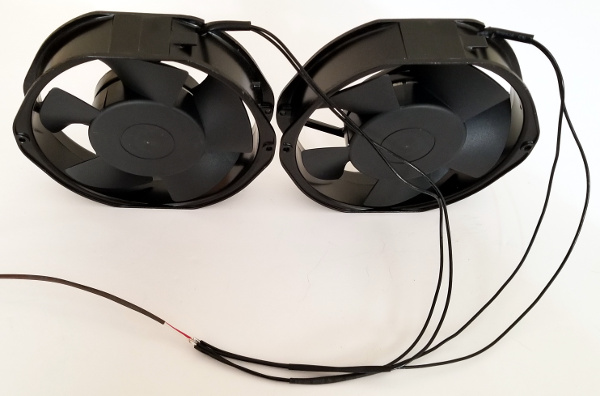
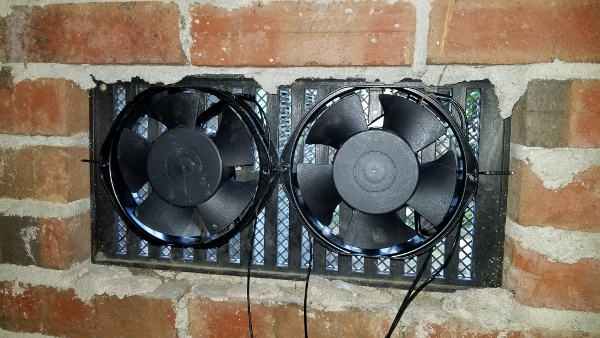
Connect the 110VAC wire to both fans.
Drill a 7/16" and 9/16" hole on either side of the enclosure for the PG7 and PG9. Use a dremel tool to enlarge the holes slightly until the gland fits snug. The PG7 will feed in the 12VDC input voltage, and the PG9 for the sensors and fans.
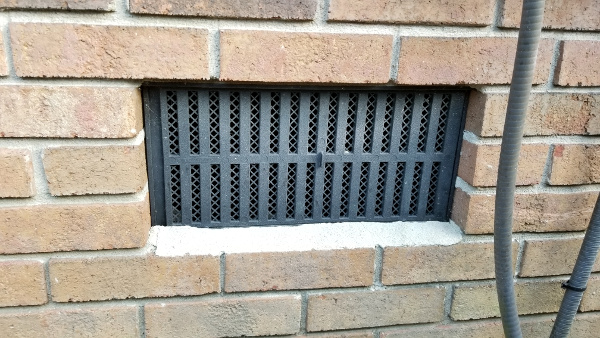
Find a vent that is opened and not blocked. This will be our exhaust that we will blow the basement/crawlspace air out. Make sure all other vents on the other side are open since these will become your air intake. Close the adjcent airvents so that you create a regional instead of a local air flow across your entire basement/crawlspace.
Mount the fans on the inside of the air vent using tie wraps. Make sure you have the fans pointing the right direction to blow air out.
Find an existing access point and thread the outside humidity sensor wire into the inside. Make sure the humidity sensor is far enough away from the house and any obstruction so that you are accurately measuring the ambient temperature/humidity. Verify your readings against your locally published weather reports.
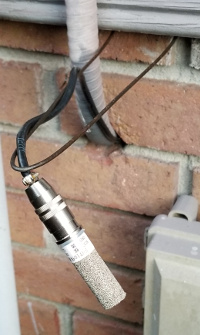
Wire the outside humidity sensor into the keystone jack and enclosure and mount it on the inside.
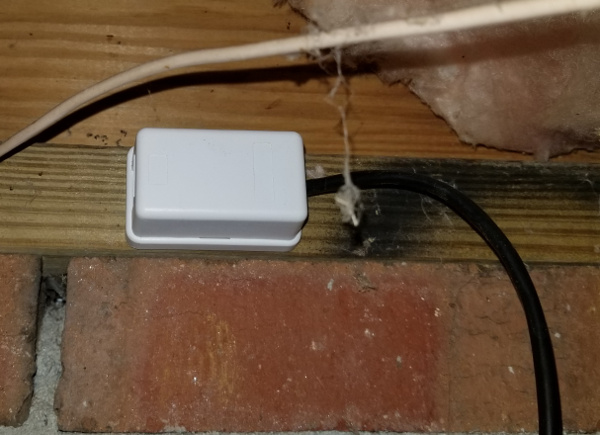
Wire the inside humidity sensor into the keystone jack and enclosure and mount it on the inside. A central location or area that needs additional moisture control is preferable.
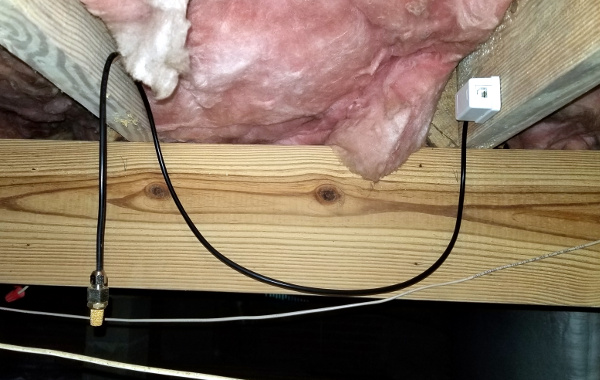
Connect the 50ft RJ11 wires to the humidity sensors and run the wires with the fan wire to an available access point where the control enclosure will be installed..
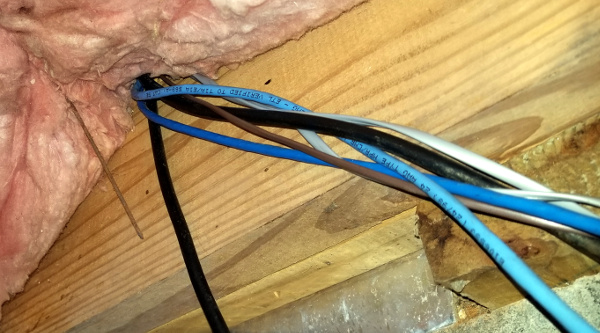
Connect all the wires and assemble/feed all the parts into the control enclosure. If your 50ft RJ11 wires come with pre-crimped connectors you will have to cut them off to feed the wires through the gland and crimp new connectors.

Test the system and make sure everything is operating correctly. To test the relay and fans disconnect the Arduino from the IO Expander and connect it directly to your computer to manually control it. Once you have verified that everything is operating, assemble all the parts into the enclosure using double sided tape and packing foam to secure your boards, and enjoy the benefits and savings of your Smart Moisture Control Ventilation System
Update 3/20/2019
After running the ventilation system in my crawlspace for the last couple of months with zero hangs and with a peak relative humidity of greater than 95% after the leak from my hot water heater it has successfully dropped the relative humidity to less than 50%. The ventilation system is an on going control system that works!
Switched from a SSD1306 0.96" OLED display to a SH1107 1.3" OLED disaplay. It's much larger and easier to read. Changing it was a breeze with the IO Expander firmware update. Just change 'ST10' to 'ST13' in your code.
Update 9/12/2019
Released v1.1 that fixed a cold boot issue where the OLED display powered blank. Still working venting my crawlspace!